MarketOmation Help & Support
-
Getting Started
-
Setting
- Account-Wide File Management
- Business Profile Creation Flow (Trust Center)
- Call Tracking and Missed Call Text Back for Google My Business
- Customizable 404 Error Page
- Email Validation
- GDPR Compliance Information
- How to Change the Currency Type
- How to Edit User Information and Permissions
- How To Include Email Signatures On All Outgoing Messages
- How To Reset Your Password
- How To Turn On/Off Alternate Timezones
- How to Use Audit Logs
- How To Use The Incorp Media LLC Dashboard
- How To Use The Universal Search Feature
- Incorp Media LLC Email Validation
- Internationalization: Multiple Language Support
- Internationalization: Multiple Language Support
- SendInBlue Setup
- Settings: Business Profile
- Settings: Company Billing Overview
- Settings: Custom Values
- Settings: Integrations
- Settings: My Staff
- Settings: Pipelines
- Settings: Reputation Management
- Settings: Tags
- Supported Media Types
- Template Library
- Show Remaining Articles (13) Collapse Articles
-
Conversations
-
Calendars
- Appointment Booking Process
- Calendar Color Codes
- Calendar Setup 101
- Calendar Sync Options
- Class Booking in Calendars
- Collective Booking - Calendars
- Google Meet Calendar Integration
- How to Add a Logo to Your Calendar
- How to Add Facebook Pixel to Survey, Forms & Calendars
- How To Block Off Time In A Calendar
- How to Copy or Duplicate a Calendar
- How to Create and Edit Calendars
- How to Deactivate and Activate Calendars
- How to Disable and Enable Calendar Services
- How to Integrate Your Outlook Calendar Using Calendar Bridge
- How to Override Calendar Availability
- How To Update Cancellation and Reschedule Links For Your Calendar
- How to Utilize the Calendar
- Outlook Calendar Integration
- Recurring Appointments
- Settings: Calendars
- Stripe Integration For Calendars
- What To Do If You Get The Google Calendar Writer Access Error
- Show Remaining Articles (8) Collapse Articles
-
Contacts
- Additional Emails per Contact
- Additional Phone Numbers per Contact
- Bulk Action Delivery Options
- Bulk Actions - Add or Remove Tags
- Bulk Actions - Deleting Contacts
- Bulk Actions - Email
- Bulk Actions - Import and Export Contacts
- Bulk Actions - Merge Duplicate Contacts
- Bulk Actions - Pipeline Change
- Bulk Actions - Sending Review Requests
- Bulk Import and Export of Multiple Emails for Contacts
- Bulk Import and Export of Multiple Phone Numbers for Contacts
- Business Fields
- Contact Company Overview
- Editing Pending and Processing Bulk Actions
- How The Sticky Contact Feature Works
- How To Add a Tag to New Contact List Import
- How to Allow or Prevent Duplicate Contacts
- How To Create and Edit Smart Lists
- How To Create and Use SMS And Email Templates
- How To Import and Export Contacts
- How to Navigate Contact Records
- How to Restore Deleted Contacts
- Managing Your Tasks Tab
- Using the Bulk Action Features
- Using the DND Feature
- Show Remaining Articles (11) Collapse Articles
-
Opportunities
-
Payments
- Affiliate Manager - Importing Contacts
- Affiliate Manager Overview
- Affiliate Manager Part 1 - How to Set Up your Affiliate Funnel with Products
- Affiliate Manager Part 2 - How to Add or Upload Affiliates
- Affiliate Manager: Media
- Apple Pay and Google Pay Invoices or Text2Pay Links
- Authorize.net Integration
- Automated Receipts for Invoices and Text2pay Link Payments
- Available Testing Cards for Payment Integrations
- Creating Recurring Invoices
- Customize Email and SMS Notifications for Invoicing
- Default Gateways for Payment Integrations
- Guide to Using Proposals and Estimates
- How to Create, Manage, and Void Invoices
- How To Customize The Tax Settings in Your Payments Section
- How To Download a PDF of an Invoice
- How to Process Refunds
- How to Test Payments in a Funnel or Website
- How To Use The Orders Tab in Your Payments Section
- How To Use The Payments Tab
- How To Use The Transactions Tab in Your Payments Section
- In Depth Look at Coupons
- Invoice Settings
- Network Merchants Inc. Integration
- Subscriptions Tab in Your Payments Section Overview
- Switching from FirstPromoter to Affiliate Manager
- Using Apple Pay and Google Pay in Order Forms
- Show Remaining Articles (12) Collapse Articles
-
Marketing
-
- "Add This Event To Your Calendar” Custom Values
- 2-way Email Sync for Outlook
- Best Practices To Prevent Your Emails from Ending up in Spam
- CC and BCC Features to Our Email Composer
- Checking Email Statistics
- Content AI in the Email Builder
- Custom Reply Address
- Email Analytics
- Email Attachment Size Limits
- Email Builder: Understanding Advance Conditions for Smart Lists and Tags
- Email Deliverability 101
- Email Statistics
- Email Templates vs Email Campaigns
- Forwarding Address and BCC in Email Setup
- Gmail 2-Way Email Sync
- How To Add the RSS Elements to Your Email Templates
- How to Change the Content of an Ongoing Email Campaign
- How to Connect SendGrid as your SMTP Service
- How to Create or Edit Your Email Signature
- How To Differentiate Between Basic and Custom for RSS Headers and Items in the Email Builder
- How to Find Hidden or Broken Elements in the Email Builder
- How To Hide Email Elements In The Mobile View Of Your Email Builder
- How to Import a Template to the Email Builder (Campaign)
- How to send a Regular Email Campaign
- How To Use RSS Feeds in the Email Builder
- How to Use the Design Editor for Email Templates
- How To Use the Email Builder
- How to Use the Email Builder and Its In-Line Editor
- How To Use Trigger Links in Emails
- Incorp Media LLC Email Authentication - DMARC
- Incorp Media LLC Email Unsubscribe Link
- Integrating Gmail for Email Service
- Introducing Email Errors
- List Unsubscribe Headers
- Masking Sender Emails - From Name and Address
- Masking the Sender's Name and Email Address in Incorp Media LLC Emails
- RSS Blocks In the Email Builder
- SMTP Error Code Tables
- Split Testing in Email Campaigns
- Test Email Error Troubleshooting
- Trigger Links in the Email Builder
- Using Custom Fonts in the Email Builder
- Using Mobile Formatting in the Email Builder
- Video Element in the Email Builder
- What To Do If Your RSS Email Body Is Showing HTML Tags
- Show Remaining Articles (30) Collapse Articles
-
- Bulk Scheduling Posts for the Social Planner Using a CSV
- Connecting Your Instagram Business Account to the Social Planner Social Media Tool
- Creating Posts in the Social Planner Social Media Tool
- Edit or Disable a Campaign
- Facebook Conversion API Integration for Lead Events
- Follow Up Comment
- How to Clear Linkedin Link Preview Cache
- How To Connect LinkedIn for the Social Planner
- How to Connect TikTok in the Social Planner
- How to Connect to Your Facebook Group for Use in the Social Planner
- How to Connect to Your Facebook Page for Use in the Social Planner
- How to Connect to Your Google My Business Page for Use in the Social Planner
- How to Connect Your Instagram Business Account With Your Facebook Account
- How To Connect Your Twitter Account for the Social Planner
- How to Create and Utilize the Group Hashtag Feature
- How To Create Groups of Social Media Accounts
- How To Post as a Page on Facebook Groups
- How to Schedule your Instagram Reel with the Social Planner
- How To Verify Your Domain With Facebook
- Instagram Direct Messaging Integration
- Instagram Direct Messaging Integration
- Launching a New Facebook Ad
- Managing Accounts
- Optimal Image and Video File Sizes and Dimensions for the Social Planner
- Post Approval in the Social Planner
- Publish Instagram Stories in the Social Planner
- Setting Up Email Notifications for Expired Social Media Accounts in the Social Planner
- Using the Social Planner Social Media Tool
- Viewing Failed Post Error Messages in the Social Planner
- What's a Follow Up Comment and How To Use it in the Social Planner
- Show Remaining Articles (15) Collapse Articles
-
-
Automation
-
- How And When To Use The Event Start Date In A Campaign
- How Does "Stop On Response" Work In A Campaign
- How To Build, Manage and Use Manual Actions in Campaigns
- How to Control Timing of Campaign Steps Using Delivery Windows
- How To Copy A Campaign
- How To Create A Basic Campaign
- How To Create An Appointment Confirmation And Appointment Reminders Campaign
- How to Create and Use the Google My Business Campaign Step
- How To Customize The From Email Address Configuration in Campaigns
- How To Enable or Disable the "Allow Multiple" feature in Campaigns
- How To Set Up Automated Calls And Voicemail Drops Within Your Campaigns
- How To Test A Campaign
- How To Use The Manual SMS Event in Campaigns
- How To Walk Through or Push Campaign Steps
- Pausing and Resuming a Campaign
- Viewing the Deliverability of Messages in Campaigns
- What Are Round Robin Campaigns And How To Use Them
- Show Remaining Articles (2) Collapse Articles
-
-
Reporting
-
Forms
- Background Images in Forms
- Create Surveys With the Template Library
- How To Add a Bump Offer in Order Forms
- How to Add or Remove Logos for Forms
- How To Build, Edit And Utilize Surveys
- How To Build, Edit, And Utilize Forms
- How to Export All Submissions from a Form or Survey
- How To Locate Survey and Form Answers
- How to Look Up Form Attribution
- How To Submit Mock Data for Forms and Surveys
- How To Use File Upload Custom Field in Forms and Surveys
- Pop-up Forms
- Signature Custom Field in Forms and Surveys
- Understanding Automatic Country Detection in Forms
- Understanding the Difference Between One-Step and Two-Step Order Forms
- Viewing Chat Widget Submissions
- Show Remaining Articles (1) Collapse Articles
-
Funnels and Websites
- Card Authorization for Subscription and Payment Plans
- Card Authorization in Websites
- Client Portal for Affiliates
- Cloudflare Setup
- Converting Funnel Steps and Website Pages Within Incorp Media LLC
- Funnel and Website Settings Overview
- How to Add A Facebook Pixel to a Funnel
- How to Add a Meta Tag for Google Search Console Domain Verification
- How to Add a One Time Product in the Funnel Builder
- How To Add a Privacy Policy and Cookies Pop Up
- How To Add A Subscription Product To Your Funnel
- How to Add Facebook Pixel to Your Website
- How To Clone and Share Funnels
- How to Connect Your Domain to a Funnel or Website
- How To Create A Custom Website
- How To Create and Add a Chat Widget to Funnels and Websites
- How To Import Your Funnels from ClickFunnels
- How To Redirect Domains (from www to non-www) - Google Domains
- How To Redirect Domains in Cloudflare (for non-www. and www.)
- How To Set Up Payment Plans In Funnels
- How To Set Up Your XML Sitemap
- How to Setup and Configure a New Domain or Subdomain
- How to Transfer a Domain to Cloudflare
- How To Upload and Utilize A Favicon
- Implementing Funnel Best Practices
- Split Testing in Funnels
- Understanding URL Paths
- Show Remaining Articles (12) Collapse Articles
-
Site Builder
- Adding the Review Widget to your Funnel or Website
- Cart Mode in One-Step and Two-Step Order Forms
- Content AI for the Site Builder
- Custom Elements in the Site Builder
- Custom Fonts in the Site Builder
- Customizing Funnel and Website Colors
- Customizing Your Funnel and Website for Mobile and Desktop Views
- Funnel and Funnel Builder Overview
- Hosted Video Element
- How To Activate The One-Click Purchase In Your Funnel Step
- How to Add An Order Form to a Funnel or Website
- How To Add Hyperlinks to Websites And Funnels
- How to Change a Logo in the Funnel or Website Builder
- How To Configure The Buttons on Your Website
- How To Create and Update Global Sections
- How to Create and Use a Coupon/Promo Code - One Step Form
- How to Create and Use a Coupon/Promo Code - Two Step Form
- How To Upload Images and Use the Media Library
- How To Use an Image Element in the Funnel Builder
- How To Use Forms, Surveys And Calendars In Funnels
- How to Use Forms, Surveys, and Calendars in Funnels
- How To Use Time Delay In The Funnel and Website Builder
- How to use URL Parameters on your Landing Page
- Image Optimization In the Site Builder
- Navigation and Search Element for Blogs
- Order Confirmation Element in the Site Builder
- Text Elements in the Site Builder
- Using a Video Element in the Funnel Builder
- Show Remaining Articles (13) Collapse Articles
-
Blogs
-
Integrations and Widget
- Google Analytics 4 Setup
- How to Import Products From Stripe
- How To Integrate A Stripe Account
- How to Integrate and Use Paypal
- How To Integrate Your Facebook Account
- How To Integrate Your Facebook Account
- How to Update Facebook Page Selection & Permissions
- Integrating with Google and Google Calendars
- Local Services Ad - Reserve with Google Integration
- Local Services Ads With Google
- Mapping Facebook Form Fields
- Quickbooks Integration
- Shopify Integration
- TikTok Integration
- Wordpress Plugin for Chat Widget
- Zoom Integration
- Show Remaining Articles (1) Collapse Articles
-
Lead Finder
-
Mailgun
-
Memberships
- Creating and Customizing The Membership App
- How To Add a Chat Widget to your Membership Section
- How To Add A Customer to Your Membership Area, Course or Offer
- How to Build and Edit an Offer in Memberships
- How To Create A Membership One-Click Upsell
- How to Create and Edit Categories in Memberships
- How to Create and Edit Posts in Memberships
- How To Customize Membership Settings
- How To Customize The Membership Welcome Email Using Membership Settings or Workflows
- How to Manually Grant Access to Memberships
- How To Setup Drip Content for Subcategories in Memberships
- How To Use Membership Themes
- Magic Links for Memberships
- Managing Comments In Your Membership Section
- Membership - Revenue Analytics
- Membership Anayltics
- Membership Assessments
- Membership Products and Offers Overview
- Membership Settings
- Membership Settings: Site Details
- Memberships Overview
- Resending Membership Credentials
- Statuses on Memberships
- Workflow Action: Membership Grant Offer
- Show Remaining Articles (9) Collapse Articles
-
Mobile App
-
Phone
- 3DS Incorp Media LLC Phone
- A2P 10DLC Campaign Vetting Changes
- Agent Reporting
- Call Tracking
- How Inbound Call Routing Works
- How To Buy a Toll Free Number
- How To Convert Voicemail Drop Files into MP3 or WAV
- How To Get an Outbound Phone Number
- How To Increase Message Deliverability
- How To Record Calls And Listen To Recordings
- How to Use SMS and Phone Number Validation
- How To Use Text 2 Pay
- How to Use the Dialer Feature for One-Time Outbound Calls
- Inbound Call Routing to the Mobile App
- Missed Call Text Back
- Options within the Dialer
- Phone Messaging Policy
- Phone Number Settings Explained
- Phone Number Settings Explained
- Setting Up a Voicemail Drop and Voicemail Drop FAQs
- SMS Attachment Size Limits
- Using the Voicemail Feature
- Whisper Message
- Show Remaining Articles (8) Collapse Articles
-
Reputation Management and Reviews
-
Triggers
- Email and Phone Number Mapping In Triggers
- How The Duration in Days Filter Works
- How To Build and Utilize Triggers
- How to Build, Edit and Use Task Related Triggers
- How To Connect Course and Funnel Checkout Using Triggers
- How to Create a Trigger for Notifications for New Chats in the Chat Widget
- How To Create An Auto Responder Using Triggers
- How to Duplicate Triggers
- How to Filter A Trigger By Product Type
- How To Mark Appointment Status as Invalid Using Triggers
- How To Set up a Campaign and Trigger for Abandoned Cart Follow Up
- How to Set Up Email/SMS Notification When An Action Occurs Using Triggers
- How To Set Up Triggers From Form Submissions
- How To Use A Trigger for a Review Request Campaign or Email
- How to Utilize Lead Values in Pipelines and Triggers
- Loop Lockouts
- Membership Triggers Overview
- What To Do If Your Send Email Trigger Action Is Not Firing
- Show Remaining Articles (3) Collapse Articles
-
Troubleshooting
- Failed Post Error in the Social Planner
- Google My Business Publishing Troubleshooting
- How to Check Your Instagram Profile Type
- How to Clear your Browser Cache
- How to Fix Your SMS Settings if You Failed to Send SMS
- How to Send a Test Email and SMS
- How To Troubleshoot When Your Call Event Is Not Working In A Campaign
- Lead Ad Debugging for Facebook
- Lead Ad Debugging for Facebook
- Loop Lockouts in Workflows
- Order Form Fingerprint is Missing Error
- Troubleshooting Audio Issues
- Troubleshooting Domains
- What To Do If A Page Won't Load
-
Twilio
-
Webhooks
-
Wordpress
-
Workflow
- Bulk Actions - Campaigns and Workflows
- Customizing Delivery Timeframes Within Workflows
- Customizing the From Email Address in Workflows
- Customizing Your Settings in Workflows
- How To Connect Course and Funnel Checkout Using Workflows
- How To Create An Appointment Confirmation And Appointment Reminders Campaign in Workflows
- How to Duplicate or Copy a Workflow
- How to Get Notified When a Lead Opens an Email
- How to Get Notified When a Lead Opens an Email
- How to Import Campaigns into Workflows
- How To Mark Appointment Status as Invalid Using a Workflow
- How To Move Actions in the Workflow Builder
- How To Set Up Automated Calls And Voicemail Drops in a Workflow
- List of Workflow Actions
- List of Workflow Triggers
- Marking Calls as Completed
- Membership Triggers Overview for the Workflow Builder
- Pausing and Resuming Workflows
- Race Conditions in Workflows (Unexpected Behavior)
- Understanding the Workflow History and Status Tabs
- Understanding the Workflow Settings Tab
- Using a Workflow and Smart List To Track Failed SMS Contacts
- Using the Conversion List for Google Ads with Triggers and Workflows
- Using the History Tab in Workflows
- Using the Testing Features in Workflows
- Workflow Action: Edit Conversation
- Workflow Action: Goal Event
- Workflow Contact Attribution Variables
- Workflow Recipes
- Show Remaining Articles (14) Collapse Articles
-
Workflow Actions
- Workflow Action: Add Contact Tag
- Workflow Action: Add Task
- Workflow Action: Add To Affiliate Campaign
- Workflow Action: Add to Affiliate Manager
- Workflow Action: Add To Notes
- Workflow Action: Add To Workflow
- Workflow Action: AI Appointment Booking Bot
- Workflow Action: Assign To User
- Workflow Action: Call
- Workflow Action: Create/Update Opportunity
- Workflow Action: Facebook - Add To Custom Audience
- Workflow Action: Facebook - Conversion API
- Workflow Action: Facebook - Remove From Custom Audience
- Workflow Action: GMB Messaging
- Workflow Action: Go To
- Workflow Action: If/Else
- Workflow Action: Instagram DM
- Workflow Action: Manual Call
- Workflow Action: Manual SMS
- Workflow Action: Math Operation
- Workflow Action: Membership Revoke Offer
- Workflow Action: Messenger
- Workflow Action: Remove Assigned User
- Workflow Action: Remove Contact Tag
- Workflow Action: Remove From Affiliate Campaign
- Workflow Action: Remove From All Workflows
- Workflow Action: Remove From Workflow
- Workflow Action: Remove Opportunity
- Workflow Action: Send Email
- Workflow Action: Send Internal Notification
- Workflow Action: Send Review Request
- Workflow Action: Send SMS
- Workflow Action: Send To Eliza Agent Platform
- Workflow Action: Set Contact DND
- Workflow Action: Set Event Start Date
- Workflow Action: Update Affiliate
- Workflow Action: Update Appointment Status
- Workflow Action: Update Contact Field
- Workflow Action: Update Custom Value
- Workflow Action: Voicemail
- Workflow Action: Wait
- Workflow Action: Webhook
- Workflow Actions: Add to Google Adwords
- Show Remaining Articles (28) Collapse Articles
-
Workflow Guides
-
Workflow Premium Triggers and Actions
- Premium Triggers and Actions - Google Sheets - Create Spreadsheet Row
- Premium Triggers and Actions - Google Sheets - Delete Specific Spreadsheet Row
- Premium Triggers and Actions - Google Sheets - Delete Spreadsheet Row using Lookup
- Premium Triggers and Actions - Google Sheets - Lookup Spreadsheet Row
- Premium Triggers and Actions - Google Sheets - Overview
- Premium Triggers and Actions - Google Sheets - Update Specific Spreadsheet Row
- Premium Triggers and Actions - Google Sheets - Update Spreadsheet Row using Lookup
- Premium Triggers and Actions - Inbound Webhook
- Premium Triggers and Actions - Number Formatter
- Premium Triggers and Actions - Slack - Send Direct Message to a User
-
Zapier
-
Workflow Trigger
- Workflow Tigger: Email Events
- Workflow Trigger: Affiliate Created
- Workflow Trigger: Appointment Status
- Workflow Trigger: Birthday Reminder
- Workflow Trigger: Call Status
- Workflow Trigger: Category Completed
- Workflow Trigger: Contact Changed
- Workflow Trigger: Contact Created
- Workflow Trigger: Contact DND
- Workflow Trigger: Contact Tag
- Workflow Trigger: Custom Date Reminder
- Workflow Trigger: Customer Replied
- Workflow Trigger: Facebook Lead Form Submitted
- Workflow Trigger: Invoice
- Workflow Trigger: Membership Category Started
- Workflow Trigger: Membership Lesson Completed
- Workflow Trigger: Membership Lesson Started
- Workflow Trigger: Membership New Signup
- Workflow Trigger: Membership Product Completed
- Workflow Trigger: Membership Product Started
- Workflow Trigger: Note Added
- Workflow Trigger: Note Changed
- Workflow Trigger: Offer Access Granted
- Workflow Trigger: Opportunity Status Changed
- Workflow Trigger: Order Form Submission
- Workflow Trigger: Order Submitted
- Workflow Trigger: Payment Received
- Workflow Trigger: Pipeline Stage Changed
- Workflow Trigger: Product Access Granted
- Workflow Trigger: Product Access Removed
- Workflow Trigger: Shopify Abandoned Checkout
- Workflow Trigger: Shopify Order Fulfilled
- Workflow Trigger: Shopify Order Placed
- Workflow Trigger: Stale Opportunities
- Workflow Trigger: Survey Submitted
- Workflow trigger: Task Added
- Workflow Trigger: Task Reminder
- Workflow Trigger: TikTok Form Submitted
- Workflow Trigger: Trigger Link Clicked
- Workflow Trigger: Twilio Validation Error
- Workflow Trigger: User Login (Membership Login)
- Workflow Trigger: Video Tracking
- Show Remaining Articles (27) Collapse Articles
-
AI Bot
-
Facebook Ad Launcher
-
Membership
-
Settings
- Add Custom Value
- Audit Log / Real-Time Event Communication
- Business Profile
- Connecting Facebook & Instagram
- Conversation AI
- Custom Values
- Facebook Form Fields Mapping
- How To Add A Custom Field
- How To Use Custom Values
- Map Facebook Fields
- Microsoft Outlook
- Setting Up Root Domains
- Setting Up Shopify Integration
- Setting Up Sub-Domains
- Settings: Integrations
- Settings: Phone Numbers
- Settings: Pipelines
- Settings: Profile
- Settings: Team Management
- Stripe Integration
- Tags
- TikTok Ads Account Integration
- URL Redirects Overview
- User Notifications
- What Are Custom Fields?
- Zoom Integration
- Show Remaining Articles (12) Collapse Articles
< All Topics
Print
Workflow Guide: Sending Membership Credentials
Workflow Membership Credentials/Welcome Email
Please Note: This guide assumes that your contacts are granted access to the membership offer through another method or workflow.
- Select “Membership New Signup”
- On the right side of the screen, there is an “Add Filter” option – For different types of offers.
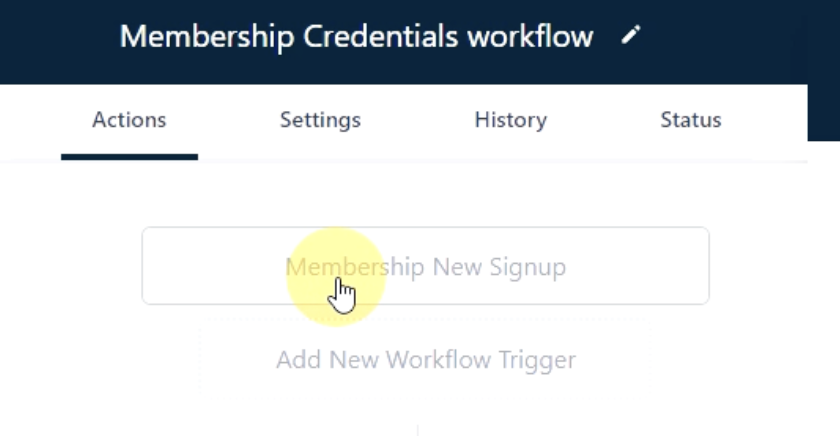


- Select the green “Save Trigger” button when done

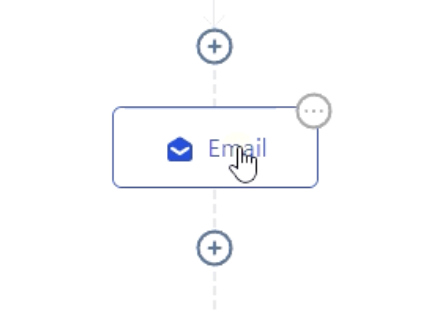
- Next, select the “Send Email” actionthis will allow you to set up an email with membership credentials- Use Custom Values in the Message so that the information will be automatically filled based on the contact that enters the workflow.
- Blue highlighted values are shown below
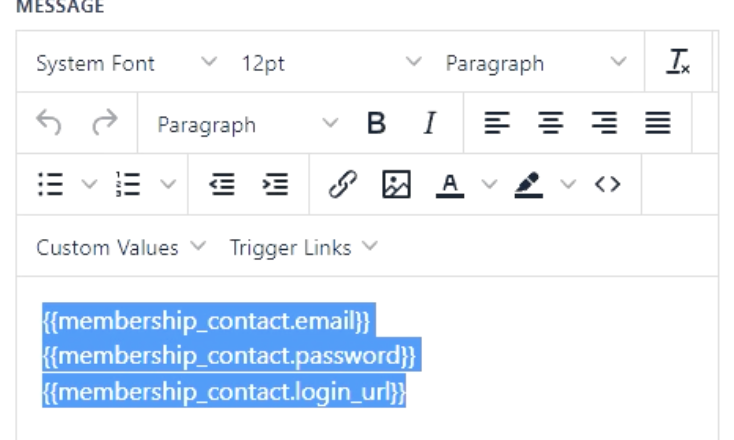
- This will only work ONCE PER USER- Unless the contact is deleted and re-added manually.
- Select the green “Save Action” button when done.

- Publish the workflow and save!
Example of Granting an offer:
Please Note: In this example workflow, we will be “Granting an offer to a membership” as if the client made a purchase

- In this example, it’s an order form as if they had made a purchase (On a funnel or website, on a particular page, a product, and the submission type.)

- Next grant the offer – This will trigger the workflow guide that was created (Above)
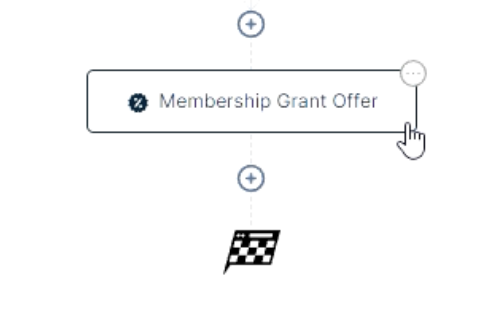
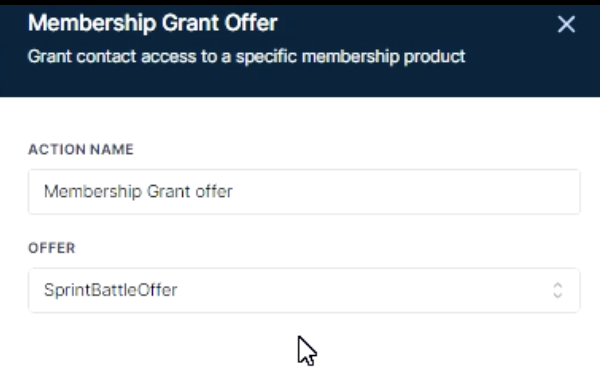
- Select the “+” button below the Membership Grant Offer trigger- This will pull up multiple actions where you can add specific actions related to the purchase.
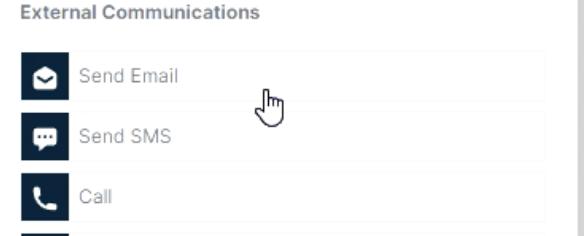
- Select the “Send Email button”
For example: Making an email that confirms their purchase(you can add a custom message

- Make sure you click the “Save Action” button

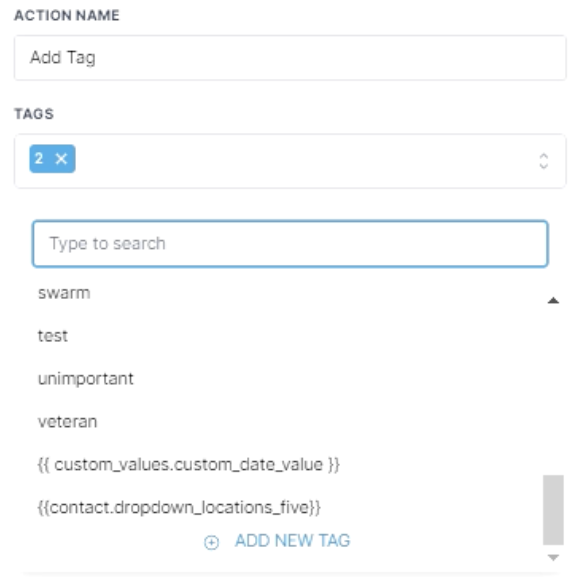
- You can also “Add Contact Tag” (For Example) that they purchased, or any custom note that you want to be tagged on this customer

- If you want someone to know internally that the customer made a purchase you can do so by Selecting “Send Internal Notification”

- Click the “Custom Values” Tab when using an internal email notification and under “Contact” go over to the “Email” option and use this value to identify the contact

- Once completed select the “Save Action” button
This will now notify an internal user of your choice.
Table of Contents